CI/CD 중, 하나인 Bitrise에서 iOS 프로젝트를 컴파일 해보다가 만난 에러를 정리했다.

첫번째 에러: xcodebuild: error: Could not resolve package dependencies:

Package.resolved file is corrupted or malformed; fix or delete the file to continue: unsupported schema version 2


Package.resolved 파일 때문에 일어나는 에러인데, 해결방법은 다음과 같다.

1. 프로젝트폴더/프로젝트이름.xcodeproj/project.xcworkspace/xcshareddata/swiftpm 폴더 아래에 있는 Package.resolved를 지우고 다시 시도한다.

2. .gitignore 파일에 Package.resolved 파일을 추가한 후, 다시 시도한다.


두번째 에러: xcodebuild: error: Failed to build workspace KeywordNews with scheme KeywordNews.

Reason: Cannot test target “KeywordNewsTests” on “iPhone 8 Plus”: iPhone 8 Plus’s iOS Simulator 15.2 doesn’t match KeywordNewsTests’s iOS Simulator 15.5 deployment target.

Cannot test target “KeywordNewsUITests” on “iPhone 8 Plus”: iPhone 8 Plus’s iOS Simulator 15.2 doesn’t match KeywordNewsUITests’s iOS Simulator 15.5 deployment target


뭔가 버전이 맞지 않는다고 나오는 에러인데, XCode 버전을 맞춰주면 해결된다.

1. Bitrise의 해당 앱의 Workflow로 들어간다.

2. Stack & Machines 메뉴에서 XCode의 버전을 현재 자신의 맥에 설치된 XCode 버전과 맞춰준 후, 다시 시도한다.

간단한 에러들이고, 해결방법도 간단하지만, 

혹시 몰라 정리해 두었다.

OS : Ubuntu 20.04

nginx : 


1. 우분투 모든 패키지 최신화하기

sudo apt update
sudo apt upgrade


2. 우분투 20.04에 최신 Nginx 설치

2-1. 기존에 Nginx가 설치 되어있다면, 먼저 삭제 합니다.

sudo systemctl stop nginx
sudo apt-get purge nginx -y && sudo apt autoremove nginx -y

2.2 최신 Nginx PPA를 추가합니다.

sudo add-apt-repository ppa:ondrej/nginx-mainline
sudo apt update

2.3 Nginx 설치

sudo apt install nginx-core nginx-common nginx nginx-full


3. 저장소에 Nginx 소스코드 추가

(Modsecurity를 컴파일 하기 위해서)

3-1. apt 구성 파일을 엽니다.

sudo nano /etc/apt/sources.list.d/ondrej-ubuntu-nginx-mainline-*.list

3-2. #주석처리 되어있는 라인 해제

# deb-src http://ppa.launchpad.net/ondrej/nginx-mainline/ubuntu/ focal main

** 아래와 같이 형태로 만들면 됩니다 **
deb http://ppa.launchpad.net/ondrej/nginx-mainline/ubuntu focal main
deb-src http://ppa.launchpad.net/ondrej/nginx-mainline/ubuntu focal main

3-3. apt update

sudo apt update


4. Nginx 소스 다운로드

- Modsecurity를 컴파일 하려면 Nginx 소스코드를 다운로드 해야 합니다.


4-1. 디렉토리 생성 및 구성

sudo mkdir /usr/local/src/nginx
cd /usr/local/src/nginx

#필요한 경우, 생성한 디렉터리에 권한을 할당합니다.
sudo chown username:username /usr/local/src -R

4-2. 종속성 설치 및 소스코드 다운로드

sudo apt install dpkg-dev
sudo apt source nginx


## 아래와 비슷한 에러메시지가 나타날 수 있지만, 무시해도 됩니다 ##
dpkg-source: info: extracting nginx in nginx-1.21.1
dpkg-source: info: unpacking nginx_1.21.1.orig.tar.gz
dpkg-source: info: unpacking nginx_1.21.1-1+ubuntu20.04.1+deb.sury.org+1.debian.tar.xz
dpkg-source: info: using patch list from debian/patches/series
dpkg-source: info: applying 0001-Make-sure-signature-stays-the-same-in-all-nginx-buil.patch
dpkg-source: info: applying 0002-define_gnu_source-on-other-glibc-based-platforms.patch
W: Download is performed unsandboxed as root as file 'nginx_1.21.1.orig.tar.gz' couldn't be accessed by user '_apt'. - pkgAcquire::Run (13: Permission denied)

4.3 다운로드 받은 Nginx 버전과 현재 설치되어있는 Nginx 버전이 같은지 확인합니다.

- 같은 버전으로 다운받아야 컴파일 할 수 있습니다.

ls

## 결과 예시 ##
onsemiro@ubuntu:/usr/local/src/nginx$ ls
nginx-1.21.1
nginx_1.21.1-1+ubuntu20.04.1+deb.sury.org+1.debian.tar.xz
nginx_1.21.1-1+ubuntu20.04.1+deb.sury.org+1.dsc
nginx_1.21.1.orig.tar.gz
nginx_1.21.1.orig.tar.gz.asc


nginx -v

## 결과 예시 ##
onsemiro@ubuntu:/usr/local/src/nginx$ nginx -v
nginx version: nginx/1.21.1


5. ModSecurity용 libmodsecurity3 설치

5.1 GIthub에서 ModSecurity 리포 복제

sudo apt install git

git clone --depth 1 -b v3/master --single-branch https://github.com/SpiderLabs/ModSecurity /usr/local/src/ModSecurity/
cd /usr/local/src/ModSecurity/

5-2. libmodsecurity3 종속성 설치

sudo apt install gcc make build-essential autoconf automake libtool libcurl4-openssl-dev liblua5.3-dev libfuzzy-dev ssdeep gettext pkg-config libpcre3 libpcre3-dev libxml2 libxml2-dev libcurl4 libgeoip-dev libyajl-dev doxygen -y

5-3. 하위 모듈 설치 및 업데이트

git submodule init
git submodule update


6. ModSecurity 환경 구축

6-1. build & configure

./build.sh
./configure

## 위 2개 명령 실행 시, 아래의 오류가 표시될 수 있지만 무시해도 됩니다 ##
fatal: No names found, cannot describe anything.

6-2. 코드 컴파일

make

sudo make install


7. ModSecurity-nginx 커넥터 설치

7-1 ModSecurity-nginx 리포 복제

sudo git clone --depth 1 https://github.com/SpiderLabs/ModSecurity-nginx.git /usr/local/src/ModSecurity-nginx/

7-2. ModSecurity-nginx 종속성 설치

sudo apt build-dep nginx
sudo apt install uuid-dev

7-3. 컴파일

sudo ./configure --with-compat --add-dynamic-module=/usr/local/src/ModSecurity-nginx
sudo make modules

7-4. 동적모듈 복사

sudo cp objs/ngx_http_modsecurity_module.so /usr/share/nginx/modules/


8. Nginx conf파일 구성 (ModSeucrity-nginx 커넥터 로드 및 구성)

8-1. nginx.conf 에서 ModSecurity 활성화

sudo nano /etc/nginx/nginx.conf

## 파일 상단에 추가 ##
load_module modules/ngx_http_modsecurity_module.so;

## http {} 섹션에 추가 ##
modsecurity on;
modsecurity_rules_file /etc/nginx/modsec/modsec-config.conf;

8-2. ModSecurity용 디렉토리 및 파일 생성 및 구성

sudo mkdir /etc/nginx/modsec/
sudo cp /usr/local/src/ModSecurity/modsecurity.conf-recommended /etc/nginx/modsec/modsecurity.conf
sudo nano /etc/nginx/modsec/modsecurity.conf

## line 7
SecRuleEngine DetectionOnly -> SecRuleEngine On

## line 224
# Log everything we know about a transaction.
SecAuditLogParts ABIJDEFHZCopied! -> SecAuditLogParts ABCEFHJKZCopied!

8-3. conf 파일 생성

sudo nano /etc/nginx/modsec/modsec-config.conf

8-4. 생성한 파일에, 다음 라인 추가

Include /etc/nginx/modsec/modsecurity.conf

8-5. ModSecurity 유니코드 매핑

sudo cp /usr/local/src/ModSecurity/unicode.mapping /etc/nginx/modsec/

8-6. nginx 테스트

sudo nginx -t

## 결과 ##
nginx: the configuration file /etc/nginx/nginx.conf syntax is ok
nginx: configuration file /etc/nginx/nginx.conf test is successful

## nginx 재시작 ##
sudo systemctl restart nginx


9. ModSecurity용 OWASP 핵심 규칙 세트 설치

9-1.  OWASP CRS 3.3.2 다운로드

wget https://github.com/coreruleset/coreruleset/archive/refs/tags/v3.3.2.zip

9-2. 압축 풀기

## unzip 설치 ##
sudo apt install unzip

## 압축 풀기 ##
sudo unzip v3.3.2.zip -d /etc/nginx/modsec

9-3. Core Rule Set 복사

sudo cp /etc/nginx/modsec/coreruleset-3.3.2/crs-setup.conf.example /etc/nginx/modsec/coreruleset-3.3.2/crs-setup.conf

9-4. Core Rule Set 추가

sudo nano /etc/nginx/modsec/modsec-config.conf

## 아래 명령문 추가 ##
Include /etc/nginx/modsec/coreruleset-3.3.2/crs-setup.conf
Include /etc/nginx/modsec/coreruleset-3.3.2/rules/*.conf

## nginx 테스트 ##
sudo nginx -t

## nginx 재시작 ##
sudo systemctl restart nginx


참고: https://ko.linuxcapable.com/how-to-install-modsecurity-with-nginx-on-ubuntu-20-04/

UIImageView의 코너를 조금 둥글게 만드는 방법을 알아보자.


UIImageView를 그냥 사용하면 요렇게 각지게 표현이 된다.


cell.imgView.layer.cornerRadius = 10

UIImageView에 위와 같이 설정해주면,

위와 같이 둥글둥글해지게 된다.


UICollectionView에 대해서 공부를 하다가, 

Cell을 만들고 배치를 해봤다.


내가 생각한 건, 좌 / 우로 배치가 되어야 하는데,

사진처럼 위 / 아래로 배치가 되버린다..


셀크기를 딱 CollectionView의 절반으로 했는데.. 왜 안될까..

뭐가 문제지 진짜 길이 하나하나 다 재보면서, 하루종일 알아보다가 찾아냈다.


원인은 UICollectionViewDelegateFlowLayout을 사용한게 원인이었는데,

해당 델리게이트의 

https://developer.apple.com/documentation/uikit/uicollectionviewdelegateflowlayout/1617696-collectionview

요 함수 때문이었다.

뭐, 아이템들의 간격을 설정해주는 함수다.


해당 함수의 설명을 보면, 요런게 있는데,

만약 해당 함수가 구현되어 있지 않으면, minimumInteritemSpacing 프로퍼티 값을 사용한다는 거다..


developer.apple.com/documentation/uikit/uicollectionviewflowlayout/1617706-minimuminteritemspacing


Apple Developer Documentation


developer.apple.com

위 링크가 minimumInteritemSpacing에 대한 설명인데,

기본값이 10.0 이다. 그래서.. 그래서.. 위/아래로 셀이 나왔던거다.

func collectionView(_ collectionView: UICollectionView, layout collectionViewLayout: UICollectionViewLayout, minimumInteritemSpacingForSectionAt section: Int) -> CGFloat {
   return 0
}

이 함수만 딱 설정해주면, 


요렇게 셀 두개가 딱 붙어있는 것을 볼 수 있다.


MyAlbum.zip
0.04MB

코드파일이다. 보통은 깃헙에 코드를 올리지만, 뭐랄까 간단한 것 같은 코드라서 그냥 파일로..

sronsemiro.tistory.com/9


Ubuntu 18.04.4 LTS, Nginx에 Let's Encrypt 설치 및 HTTPS적용(SSL)

1. Certbot 설치 // add repo $ sudo add-apt-repository ppa:certbot/certbot // install certbot $ sudo apt install python-certbot-nginx 2. HTTPS(SSL)을 설정할, nginx 설정 체크 // check server_name $ su..

sronsemiro.tistory.com

기존 시스템을 유지하고 있었으므로,

Ubuntu 18.04.4 / nginx 로 운영중이다.


예전에 작성해두었던, 위 글을 참조해서 오랜만에 SSL을 적용하려고 아래 명령어를 입력했다.

certbot --nginx -d AAA.co.kr -d www.AAA.co.kr


그랬더니, 생각보다 오랜 시간이 걸린 후, 아래와 같은 에러 메시지가 나왔다.

Failed authorization procedure. AAA.co.kr (http-01): urn:ietf:params:acme:error:unauthorized :: The client lacks sufficient authorization :: Invalid response from http://AAA.co.kr/.well-known/acme-challenge/96Ot7ZF9cVMwcycFhodd96TXi97sFQ9OR7Ln2sPpwN4 [183.111.125.112]: "\n<!DOCTYPE html>\n<html class=\"html\" lang=\"ko-KR\" itemscope itemtype=\"http://schema.org/WebPage\">\n<head>\n\t<meta charset=\"UTF-8\">\n", www.AAA.co.kr (http-01): urn:ietf:params:acme:error:unauthorized :: The client lacks sufficient authorization :: Invalid response from http://AAA.co.kr/.well-known/acme-challenge/YTz6-bfcu9UWltNrFoqkYxrURdasHSTSePse7oH6zyI [183.111.125.112]: "<html>\r\n<head><title>504 Gateway Time-out</title></head>\r\n<body>\r\n<center><h1>504 Gateway Time-out</h1></center>\r\n<hr><center>ng"

IMPORTANT NOTES:
 - The following errors were reported by the server:

   Domain: AAA.co.kr
   Type:   unauthorized
   Detail: Invalid response from
   http://AAA.co.kr/.well-known/acme-challenge/96Ot7ZF9cVMwcycFhodd96TXi97sFQ9OR7Ln2sPpwN4
   [183.111.125.112]: "\n<!DOCTYPE html>\n<html class=\"html\"
   lang=\"ko-KR\" itemscope
   itemtype=\"http://schema.org/WebPage\">\n<head>\n\t<meta
   charset=\"UTF-8\">\n"

   Domain: www.AAA.co.kr
   Type:   unauthorized
   Detail: Invalid response from
   http://AAA.co.kr/.well-known/acme-challenge/YTz6-bfcu9UWltNrFoqkYxrURdasHSTSePse7oH6zyI
   [183.111.125.112]: "<html>\r\n<head><title>504 Gateway
   Time-out</title></head>\r\n<body>\r\n<center><h1>504 Gateway
   Time-out</h1></center>\r\n<hr><center>ng"

   To fix these errors, please make sure that your domain name was
   entered correctly and the DNS A/AAAA record(s) for that domain
   contain(s) the right IP address.

이전이랑 똑같이 했는데,.. 왜 안되지..?


이것저것 찾아보니, 발생할 수 있는 이유는 여러가지가 있었다.

1. 해당 주소가 https로 리다이렉트 되고 있는 경우.

2. 해당 URL의 .well-known/acme-challenge/ <=== 이 경로로 접근이 안되는경우

3. 위 에러코드에도 나오듯이 제대로 된 IP주소가 아니거나 DNS 설정이 잘못된 경우 

등등..


근데 나는 아무것도 해당되지 않았다.

그래서 어떻게 해야 할까 고민하다가.


인증서만 발급받고 나머지 설정은 수동으로 하는 방법을 찾았고, 시도해봤다.


letsencrypt certonly --webroot --webroot-path=/var/www/AAA -d AAA.co.kr -d www.AAA.co.kr

certbot은 인증서를 발급받고, 설정까지 자동으로 해주는 반면

letsencrypt 명령어를 사용하면, 수동으로 설정해줄 수 있다. 

(이게 맞나? 정확히는 모르겠다..)


--webroot --webroot-path

여기서 --webroot는 인증서를 발급받을 홈페이지 소스가 있는 폴더의 경로를 적어주면 된다.


Saving debug log to /var/log/letsencrypt/letsencrypt.log
Plugins selected: Authenticator webroot, Installer None
Obtaining a new certificate
Performing the following challenges:
http-01 challenge for AAA.co.kr
http-01 challenge for www.AAA.co.kr
Using the webroot path /var/www/1800_7058_co_kr for all unmatched domains.
Waiting for verification...
Cleaning up challenges

IMPORTANT NOTES:
 - Congratulations! Your certificate and chain have been saved at:
   /etc/letsencrypt/live/AAA.co.kr/fullchain.pem
   Your key file has been saved at:
   /etc/letsencrypt/live/AAA.co.kr/privkey.pem
   Your cert will expire on 2020-12-18. To obtain a new or tweaked
   version of this certificate in the future, simply run certbot
   again. To non-interactively renew *all* of your certificates, run
   "certbot renew"
 - If you like Certbot, please consider supporting our work by:

   Donating to ISRG / Let's Encrypt:   https://letsencrypt.org/donate
   Donating to EFF:                    https://eff.org/donate-le


명령어를 실행하면, 위와 같이 잘 되었다고 나온다.

그러면, /etc/letsencrypt/archive/AAA.co.kr 경로아래에 인증서들이 발급된 것을 확인할 수 있다.


그럼 이제, 이 인증서들을 이용해서, nginx에 설정해주면 된다.

server {
 ## 이 부분은 http로 접속하면, https로 리다이렉트 시켜주는 부분이다 ##
 listen 80;
 root /var/www/AAA;
 server_name AAA.co.kr www.AAA.co.kr;

 return       301 https://$server_name$request_uri;
}

server {
 listen 443 ssl http2;
 root /var/www/sbcompany_co_kr;
 server_name AAA.co.kr www.AAA.co.kr;
 index index.php;

 ## 아래 4줄이 아까 발급받은 인증서를 설정 하는 부분이다. ##
 ssl_certificate /etc/letsencrypt/live/AAA.co.kr/fullchain.pem;
 ssl_certificate_key /etc/letsencrypt/live/AAA.co.kr/privkey.pem;
 include /etc/letsencrypt/options-ssl-nginx.conf;
 ssl_dhparam /etc/letsencrypt/ssl-dhparams.pem;
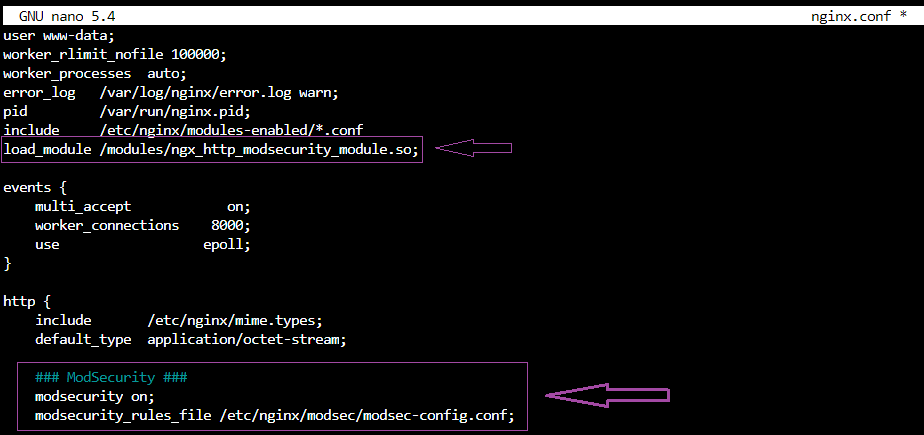
 modsecurity on;
 modsecurity_rules_file /etc/nginx/modsec/modsec_includes.conf;
 #modsecurity_rules_file /etc/nginx/modsec/modsecurity.conf;

 location ~* \.(jpg|jpeg|gif|png|css|js|ico|xml)$ {
     access_log        off;
     log_not_found     off;
     expires           360d;
 }

 access_log /var/log/nginx/sbcompany_co_kr/access.log;

 location / {
 try_files $uri $uri/ /index.php?q=uri&$args;
 }

 location ~ \.php$ {
 include snippets/fastcgi-php.conf;
 fastcgi_pass unix:/var/run/php/php7.2-fpm.sock;
 }

 location ~ /xmlrpc.php {
  deny all;
  return 444;
 }
}

nginx에 해당 사이트의 site설정에 위 4줄을 추가해주면 된다.

끝~~


서버환경

Ubuntu 18.04.4 LTS

Nginx 1.19.1


기존 운영 도메인

1. AAA.com

2. BBB.Com (SSL 적용완료)

3. a.CCC.com

4 b.CCC.com (SSL 적용완료)

..등등 약 30개 정도 사이트


위 환경의 서버에서, Letsencrypt를 이용해서, 추가로 x.CCC.com 사이트에 SSL를 설정하고 있었다.

그런데, 자꾸 인증과정에서 에러가 발생했고,

추가적으로, https://asdf.CCC.com 과 같이 현재 서버에는 설정되어 있지 않은, 주소로 접속을 시도하면, 

기존에 SSL이 설정되어 있던, https://BBB.com 으로 접속이 되는 현상이 있었다.


이게, 기존부터 이렇게 되었던 건지,

아니면, 어떤 이유로 발생 했는지는 모르겠다.


여기저기 찾아보다가, 

qastack.kr/server/578648/properly-setting-up-a-default-nginx-server-for-https


위의 링크를 찾게 되었고, 해결했다.


이유는 바로, default 파일이 없어서 발생했던거다.

또한, default 파일도, http로 접속했을때와, https로 접속했을때 둘다를 설정해주어야 한다.


나는 그래서 아래와 같이 설정했다.

server {
  listen 80 default_server;
  listen [::]:80 default_server;
  listen 443 default_server;
  listen [::]:443 default_server;

  root /var/www/html;
  index index.html;

  server_name _;

  ssl_certificate /etc/nginx/ssl/nginx.crt;
  ssl_certificate_key /etc/nginx/ssl/nginx.key;

  location / {
    try_files $uri $uri/ =404;
    }
}


이렇게 설정후, nginx를 재시작 또는 reload를 하면,

위의 설명했던 현상이 발생하지 않게 된다.


또, default를 설정하지 않았을 때,

없는 주소로, https 를 이용해서 접속하게 되면,

https://BBB.com이 접속되는데, 

아마 그 이유는 sites-available 안에 파일 중,

SSL이 설정된 가장 첫번째 파일의 주소로 접속되는 것 같다. (알파벳 순)


이상하게, 서버가 느려지는 것 같은 느낌이 들어서,

nginx 서버 튜닝을 알아보다 보니, log에 관련된 이야기가 나왔다.

그래서, 어떻게 되어있나 살펴보니.. 헉..

80만 라인이 넘어가고 있었다..


아아..


어떻게 해야 하나 찾아보다가

logrotate를 알게 되었다.


일단 logrotate를 설치하자.

sudo apt-get install logrotate


그리고, /etc/logrotate.d/nginx 파일을 만들고

아래 코드를 추가하자.

## 보통은 이 부분만 만든다.
/var/log/nginx/*.log {
        daily
        missingok
        rotate 52
        compress
        delaycompress
        notifempty
        create 640 nginx adm
        sharedscripts
        postrotate
                if [ -f /var/run/nginx.pid ]; then
                        kill -USR1 `cat /var/run/nginx.pid`
                fi
        endscript
}

## 나는 로그를 서브도메인별로 따로따로 저장하게 설정이 되어있어서,
## 이 부분까지 설정해 주었다.
/var/log/nginx/*/*.log {
        daily
        missingok
        rotate 52
        compress
        delaycompress
        notifempty
        create 640 nginx adm
        sharedscripts
        postrotate
                if [ -f /var/run/nginx.pid ]; then
                        kill -USR1 `cat /var/run/nginx.pid`
                fi
        endscript
}

각각이 뜻하는 바를 알아보면,

  • daily : 하루치를 따로따로 보관하자.
  • missingok : 로그 파일이 없어도 에러를 내지말자.
  • rotate 52 : 로그 파일을 52개까지만 보관하자. 위에 daily로 설정되어 있으니, 52일치만 보관하고, 53일째 되는 로그는 삭제.
  • compress : 로그를 압축해서 보관하자.
  • notifempty: 로그파일이 비어있으면, 로테이트 하지 않습니다.
  • create 640 nginx adm : 로그파일은 새로 생성시에, 파일 권한을 640으로 생성하고, 소유자/그룹은 nginx로 하자.
  • postrotate : 로테이트 작업이 끝난후에, 실행할 스크립트를 입력합니다.


위 설정 후, 정상적으로 설정되었는지, 테스트하기 위해서 아래의 명령어를 실행합니다.

logrotate -d -f /etc/logrotate.d/nginx


정상적으로 설정되었다면, /etc/cron.daily/logrotate 파일로 인해서, 매일 자동 실행됩니다.


혹시, /etc/cron.daily/logrotate 파일이 없다면,

아래와 같이 만들어 주자.


#!/bin/sh

# Clean non existent log file entries from status file
cd /var/lib/logrotate
test -e status || touch status
head -1 status > status.clean
sed 's/"//g' status | while read logfile date
do
    [ -e "$logfile" ] && echo "\"$logfile\" $date"
done >> status.clean
mv status.clean status

test -x /usr/sbin/logrotate || exit 0
/usr/sbin/logrotate /etc/logrotate.conf


참고 : https://www.lesstif.com/system-admin/nginx-log-rotate-logrotate-75956229.html

남의 코드를 보다 보니, 

convenience init 이라는 키워드가 나와서, 알아보기로 했다.


    public init(grid: Grid = Grid(), sections: [Section] = []) {
        self.grid = grid
        self.sections = sections
        
        super.init()
    }
    
    public convenience init(grid: Grid = Grid(), _ sections: [[ViewModelProtocol]]) {
        let sections = sections.map { items in
            return Section(grid: grid, header: nil, footer: nil, items: items)
        }
        self.init(grid: grid, sections: sections)  ## convenience init 함수에는 이렇게, 다른 init함수를 호출해줘야 한다.
    }

따로, 예제가 없어서, 현재 내가 보고 있는 코드를 예제로 쓴다.

저자가 마음대로 막 가져다 쓰라고 했으니... 


convenience init은 init함수와 똑같은데, 파라미터 중 일부를 기본값으로 가져올 수 있다.

그리고, 약간 보조적인 성경의 init이다 보니, 꼭 다른 init을 호출해줘야 한다는 규칙이 있다.


+ Recent posts