OS : Ubuntu 20.04
nginx :
1. 우분투 모든 패키지 최신화하기
sudo apt update
sudo apt upgrade
2. 우분투 20.04에 최신 Nginx 설치
2-1. 기존에 Nginx가 설치 되어있다면, 먼저 삭제 합니다.
sudo systemctl stop nginx
sudo apt-get purge nginx -y && sudo apt autoremove nginx -y
2.2 최신 Nginx PPA를 추가합니다.
sudo add-apt-repository ppa:ondrej/nginx-mainline
sudo apt update
2.3 Nginx 설치
sudo apt install nginx-core nginx-common nginx nginx-full
3. 저장소에 Nginx 소스코드 추가
(Modsecurity를 컴파일 하기 위해서)
3-1. apt 구성 파일을 엽니다.
sudo nano /etc/apt/sources.list.d/ondrej-ubuntu-nginx-mainline-*.list3-2. #주석처리 되어있는 라인 해제
# deb-src http://ppa.launchpad.net/ondrej/nginx-mainline/ubuntu/ focal main

** 아래와 같이 형태로 만들면 됩니다 **
deb http://ppa.launchpad.net/ondrej/nginx-mainline/ubuntu focal main
deb-src http://ppa.launchpad.net/ondrej/nginx-mainline/ubuntu focal main
3-3. apt update
sudo apt update
4. Nginx 소스 다운로드
- Modsecurity를 컴파일 하려면 Nginx 소스코드를 다운로드 해야 합니다.
4-1. 디렉토리 생성 및 구성
sudo mkdir /usr/local/src/nginx
cd /usr/local/src/nginx

#필요한 경우, 생성한 디렉터리에 권한을 할당합니다.
sudo chown username:username /usr/local/src -R
4-2. 종속성 설치 및 소스코드 다운로드
sudo apt install dpkg-dev
sudo apt source nginx


## 아래와 비슷한 에러메시지가 나타날 수 있지만, 무시해도 됩니다 ##
dpkg-source: info: extracting nginx in nginx-1.21.1
dpkg-source: info: unpacking nginx_1.21.1.orig.tar.gz
dpkg-source: info: unpacking nginx_1.21.1-1+ubuntu20.04.1+deb.sury.org+1.debian.tar.xz
dpkg-source: info: using patch list from debian/patches/series
dpkg-source: info: applying 0001-Make-sure-signature-stays-the-same-in-all-nginx-buil.patch
dpkg-source: info: applying 0002-define_gnu_source-on-other-glibc-based-platforms.patch
W: Download is performed unsandboxed as root as file 'nginx_1.21.1.orig.tar.gz' couldn't be accessed by user '_apt'. - pkgAcquire::Run (13: Permission denied)
4.3 다운로드 받은 Nginx 버전과 현재 설치되어있는 Nginx 버전이 같은지 확인합니다.
- 같은 버전으로 다운받아야 컴파일 할 수 있습니다.
ls

## 결과 예시 ##
onsemiro@ubuntu:/usr/local/src/nginx$ ls
nginx-1.21.1
nginx_1.21.1-1+ubuntu20.04.1+deb.sury.org+1.debian.tar.xz
nginx_1.21.1-1+ubuntu20.04.1+deb.sury.org+1.dsc
nginx_1.21.1.orig.tar.gz
nginx_1.21.1.orig.tar.gz.asc


nginx -v

## 결과 예시 ##
onsemiro@ubuntu:/usr/local/src/nginx$ nginx -v
nginx version: nginx/1.21.1
5. ModSecurity용 libmodsecurity3 설치
5.1 GIthub에서 ModSecurity 리포 복제
sudo apt install git

git clone --depth 1 -b v3/master --single-branch https://github.com/SpiderLabs/ModSecurity /usr/local/src/ModSecurity/
cd /usr/local/src/ModSecurity/
5-2. libmodsecurity3 종속성 설치
sudo apt install gcc make build-essential autoconf automake libtool libcurl4-openssl-dev liblua5.3-dev libfuzzy-dev ssdeep gettext pkg-config libpcre3 libpcre3-dev libxml2 libxml2-dev libcurl4 libgeoip-dev libyajl-dev doxygen -y5-3. 하위 모듈 설치 및 업데이트
git submodule init
git submodule update
6. ModSecurity 환경 구축
6-1. build & configure
./build.sh
./configure

## 위 2개 명령 실행 시, 아래의 오류가 표시될 수 있지만 무시해도 됩니다 ##
fatal: No names found, cannot describe anything.
6-2. 코드 컴파일
make

sudo make install
7. ModSecurity-nginx 커넥터 설치
7-1 ModSecurity-nginx 리포 복제
sudo git clone --depth 1 https://github.com/SpiderLabs/ModSecurity-nginx.git /usr/local/src/ModSecurity-nginx/7-2. ModSecurity-nginx 종속성 설치
sudo apt build-dep nginx
sudo apt install uuid-dev
7-3. 컴파일
sudo ./configure --with-compat --add-dynamic-module=/usr/local/src/ModSecurity-nginx
sudo make modules
7-4. 동적모듈 복사
sudo cp objs/ngx_http_modsecurity_module.so /usr/share/nginx/modules/
8. Nginx conf파일 구성 (ModSeucrity-nginx 커넥터 로드 및 구성)
8-1. nginx.conf 에서 ModSecurity 활성화
sudo nano /etc/nginx/nginx.conf

## 파일 상단에 추가 ##
load_module modules/ngx_http_modsecurity_module.so;

## http {} 섹션에 추가 ##
modsecurity on;
modsecurity_rules_file /etc/nginx/modsec/modsec-config.conf;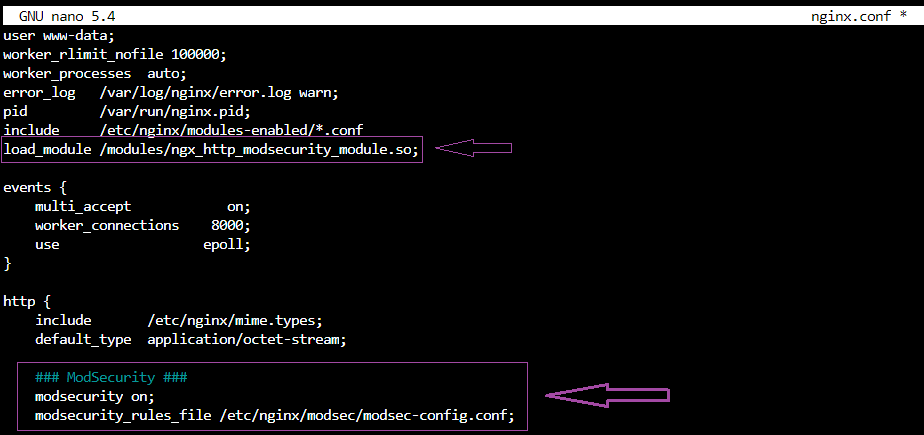
8-2. ModSecurity용 디렉토리 및 파일 생성 및 구성
sudo mkdir /etc/nginx/modsec/
sudo cp /usr/local/src/ModSecurity/modsecurity.conf-recommended /etc/nginx/modsec/modsecurity.conf
sudo nano /etc/nginx/modsec/modsecurity.conf

## line 7
SecRuleEngine DetectionOnly -> SecRuleEngine On

## line 224
# Log everything we know about a transaction.
SecAuditLogParts ABIJDEFHZCopied! -> SecAuditLogParts ABCEFHJKZCopied!
8-3. conf 파일 생성
sudo nano /etc/nginx/modsec/modsec-config.conf8-4. 생성한 파일에, 다음 라인 추가
Include /etc/nginx/modsec/modsecurity.conf8-5. ModSecurity 유니코드 매핑
sudo cp /usr/local/src/ModSecurity/unicode.mapping /etc/nginx/modsec/8-6. nginx 테스트
sudo nginx -t

## 결과 ##
nginx: the configuration file /etc/nginx/nginx.conf syntax is ok
nginx: configuration file /etc/nginx/nginx.conf test is successful

## nginx 재시작 ##
sudo systemctl restart nginx
9. ModSecurity용 OWASP 핵심 규칙 세트 설치
9-1. OWASP CRS 3.3.2 다운로드
wget https://github.com/coreruleset/coreruleset/archive/refs/tags/v3.3.2.zip9-2. 압축 풀기
## unzip 설치 ##
sudo apt install unzip

## 압축 풀기 ##
sudo unzip v3.3.2.zip -d /etc/nginx/modsec
9-3. Core Rule Set 복사
sudo cp /etc/nginx/modsec/coreruleset-3.3.2/crs-setup.conf.example /etc/nginx/modsec/coreruleset-3.3.2/crs-setup.conf9-4. Core Rule Set 추가
sudo nano /etc/nginx/modsec/modsec-config.conf

## 아래 명령문 추가 ##
Include /etc/nginx/modsec/coreruleset-3.3.2/crs-setup.conf
Include /etc/nginx/modsec/coreruleset-3.3.2/rules/*.conf

## nginx 테스트 ##
sudo nginx -t

## nginx 재시작 ##
sudo systemctl restart nginx
참고: https://ko.linuxcapable.com/how-to-install-modsecurity-with-nginx-on-ubuntu-20-04/
'컴퓨터 > Server' 카테고리의 다른 글
| [Error/Letsencrypt] Type: unauthorized / Detail : Invaild response from / urn:ietf:params:acme:error:unauthorized 오류 해결 (0) | 2020.09.20 |
|---|---|
| [Error][Nginx] 없는 https로 접근한 경우, 다른 주소로 접속되는 현상. (0) | 2020.08.31 |
| Nginx log 일자별로 관리하기 - logrotate (0) | 2020.08.30 |
| [Ubuntu] chmod 폴더만 또는 파일만 권한 변경하기 (0) | 2020.08.11 |
| Ubuntu 18.04.4 LTS, Nginx에 Let's Encrypt 설치 및 HTTPS적용(SSL) (0) | 2020.06.21 |